Tag

Windows 10

Browsing

By 

Like almost all operating systems, Windows 10 is vulnerable to security and privacy issues, and researchers have proved that Microsoft can track a lot of your activities to improve their products and enable personalized ads and promotions.

Thankfully, Windows 10 allows us to improve the operating system’s security and privacy using the built-in settings app. If you’ve concerns about your data security and privacy, you should consider making the below changes.

Security features you should know about

Below we outline some important features that can enhance the security of Windows 10 devices.

Potentially Unwanted App (PUA)

In Windows 10 version 2004 or newer, there’s a new feature called Potentially unwanted applications (PUA) protection. As the name suggests, PUA protection allows Windows 10 to detect potentially unwanted apps using Microsoft Defender (formerly known as Windows Defender).

PUA

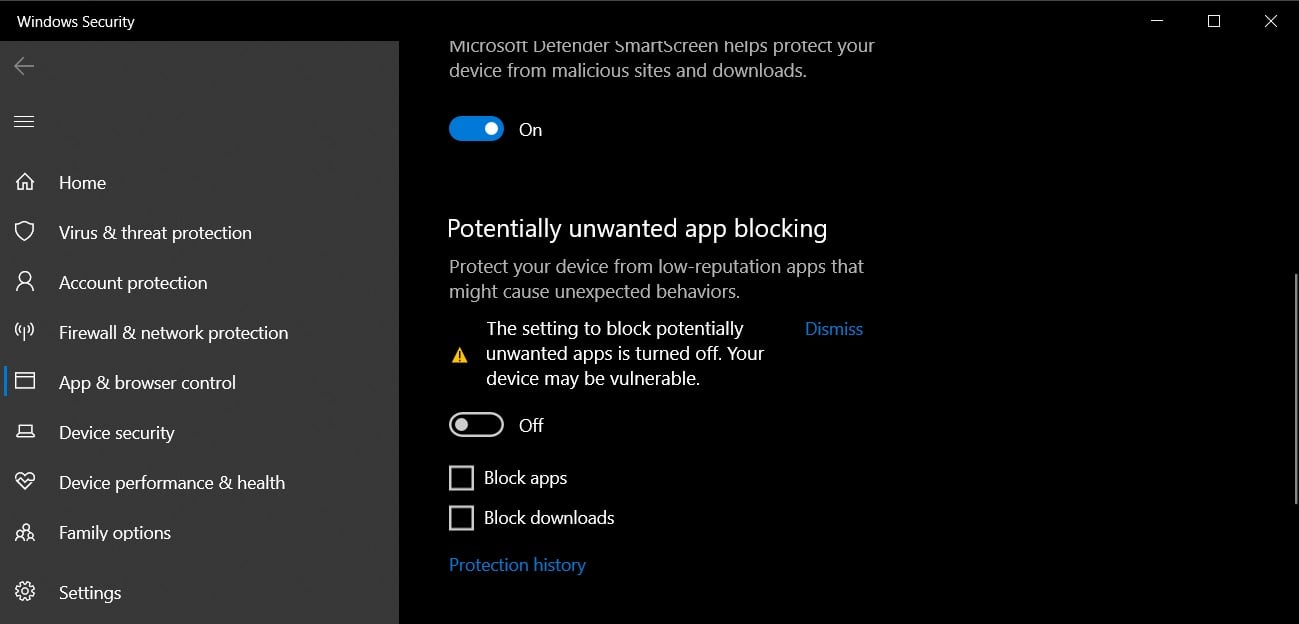
For those uninitiated, potentially unwanted applications (PUA) generally cause issues with Windows and other installed apps, and they can also make your device slower or buggy. These unwanted apps are not considered virus or malware, but it’s widely believed that they can modify your web browsers, change the default behaviour and perform other actions without your permission.

To enable PUA/PUP protection in Windows 10 2004, follow these steps:

  1. Open Settings.
  2. Navigate to Update & Security > Windows Security > App & browser control.
  3. Look for a new section titled ‘Reputation-based protection‘.

You can click on the ‘Turn on’ button to enable the feature. If you want to configure PUA/PUP, you can also click on the ‘Reputation-based protection settings’.

This will allow you to access the following settings:

  • Check apps and files.
  • SmartScreen for Microsoft Edge.
  • SmartScreen for Microsoft Store apps.

For more detailed information, see our article on how Windows 10 2004 improves potentially unwanted app protection.

Memory Integrity

Windows 10 comes with another brilliant feature called “Core isolation”, which aims to protect your device against malware and other attacks. Core isolation feature isolates computer processes from the software and hardware, and it enables an extra layer of security against sophisticated attacks.

Memory integrity, which is a part of Core isolation, uses hardware virtualization and Hyper-V to prevent attempts to inject and run malware in Windows kernel-mode processes.

Memory Integrity

In order to use core isolation’s memory integrity feature, follow these steps:

  1. Open Settings.
  2. Navigate to Update & Security > Windows Security.
  3. Click on Device security.
  4. Under “Core isolation” and “Memory integrity“, turn on the Memory integrity toggle switch.
  5. Restart Windows to apply changes.

Controlled Folder Access

Another exciting security feature in Windows 10 is  “Controlled Folder Access”, which basically allows you to prevent unauthorized access to certain folders.

This feature gives you greater control over sensitive folders and it can also prevent ransomware or any attempt to access and encrypt your documents, pictures, and other files stored in those folders.

    1. Open Windows Security.
    2. Click on ‘Virus & threat protection
    3. Click on ‘Ransomware protection
    4. Locate the “Controlled folder access” section and click the On/Off toggle.Controlled folder access
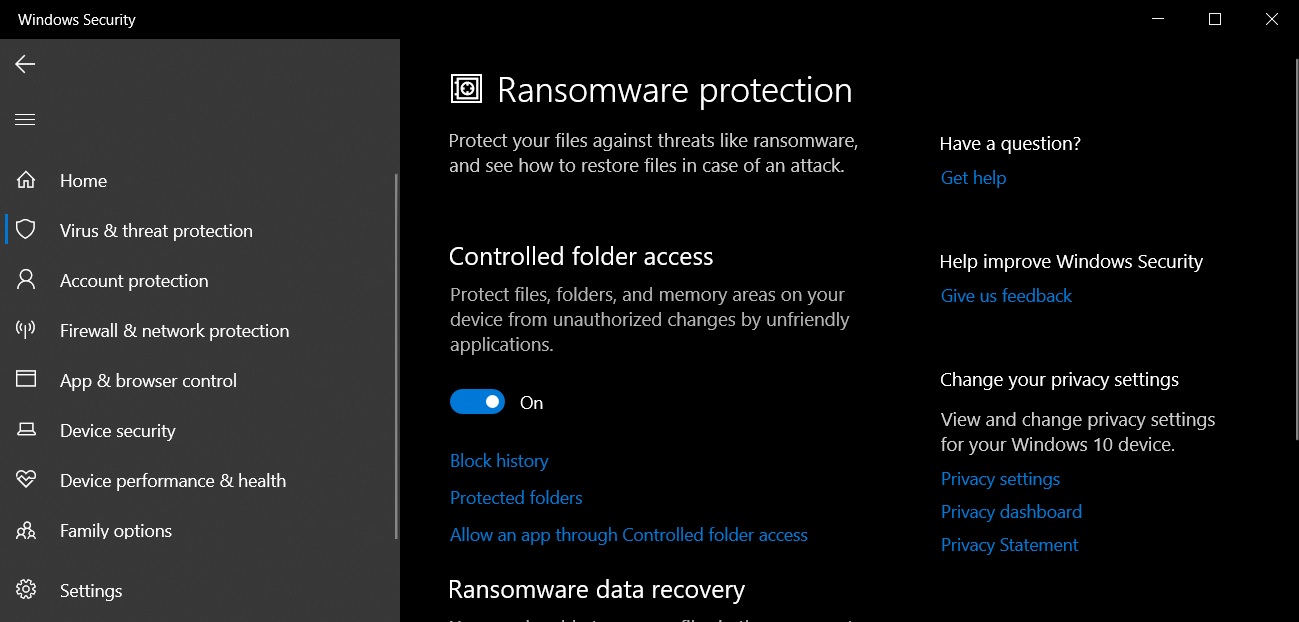
  1. Select the “Protected folders” option.Protected folders
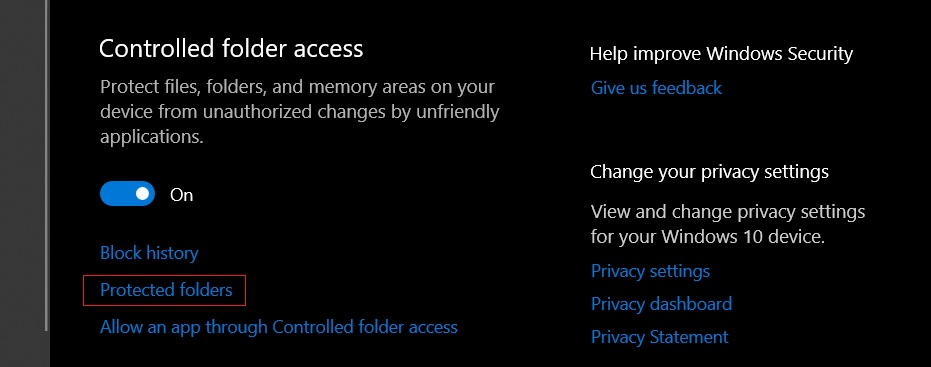
  2. Add all the folders that you want to restrict access to.

For more detailed information, see our article on how Controlled Folder access works.

Network scanning

Network scanning is included with Windows Defender and it allows you to scan your network files. However, the feature is disabled by default and interested users need to enable it manually with PowerShell.

To use enable network scanning, follow these steps:

  1. Open Windows Search.
  2. Search for PowerShell and click the Run as administrator option.
  3. Type the following command:
    Set-MpPreference -DisableScanningNetworkFiles 0Network scan
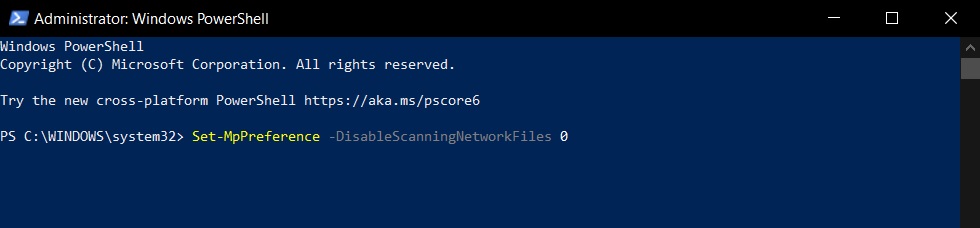
  4. Press Enter to enable scan network files

By following the above steps, you can use Defender to scan network files. If you want to turn off the feature, enter the following command in PowerShell:

  • Set-MpPreference -DisableScanningNetworkFiles 1

Windows 10 settings to increase your privacy

If you’re concerned about privacy and how your data is being used by Microsoft, you should make the below changes to increase privacy in Windows 10.

Turn off ads and tracking

All consumer-oriented versions of Windows 10 show ads or recommendations by default and Microsoft also create an advertising ID for your user account. The advertising ID is linked to your Microsoft account and it is used to trailer recommendations/ads for Microsoft services.

Fortunately, Windows 10 allows you to turn off the advertising ID and it even lets you disable the ads that you see in the Start menu and other places.

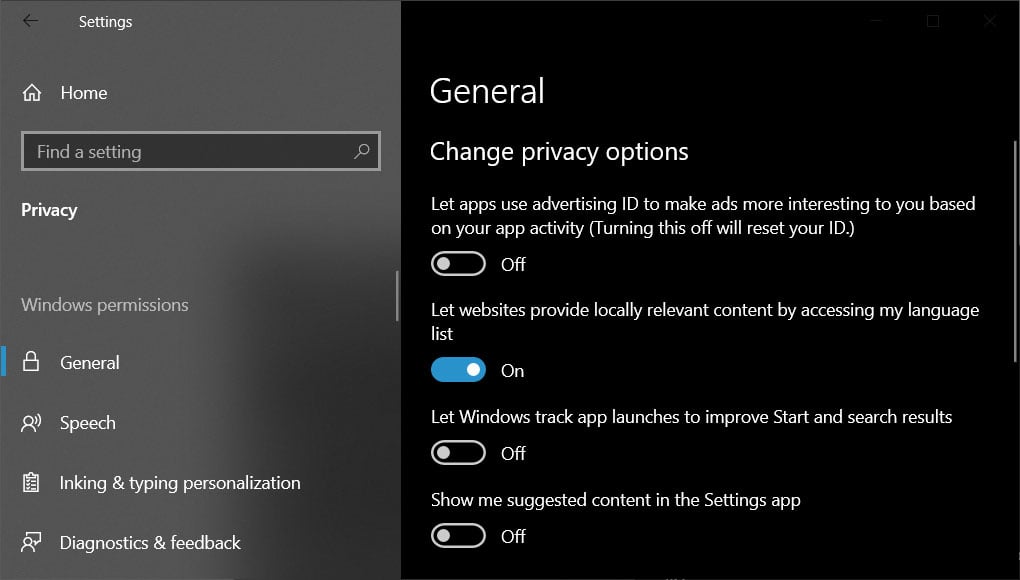
To turn off the settings, follow these steps:

  1. Launch Settings.
  2. Go to Privacy > General.
  3. Under the “Change privacy options” section, toggle Off the following options:
    1. Let apps use advertising ID to make ads more interesting …
    2. Let Windows track app launches to improve Start and search results
    3. Show me suggested content in the Settings app“.

When done, your General settings should look like the following image.

Settings privacy

Disable Start Menu suggestions and promotions

As mentioned above, Microsoft uses Start Menu to show suggestions/ads/recommendations for Microsoft Store apps and services. For example, Microsoft recently started displaying ads for the new Microsoft Edge browser in the Start Menu.

Disable show start menu suggestions

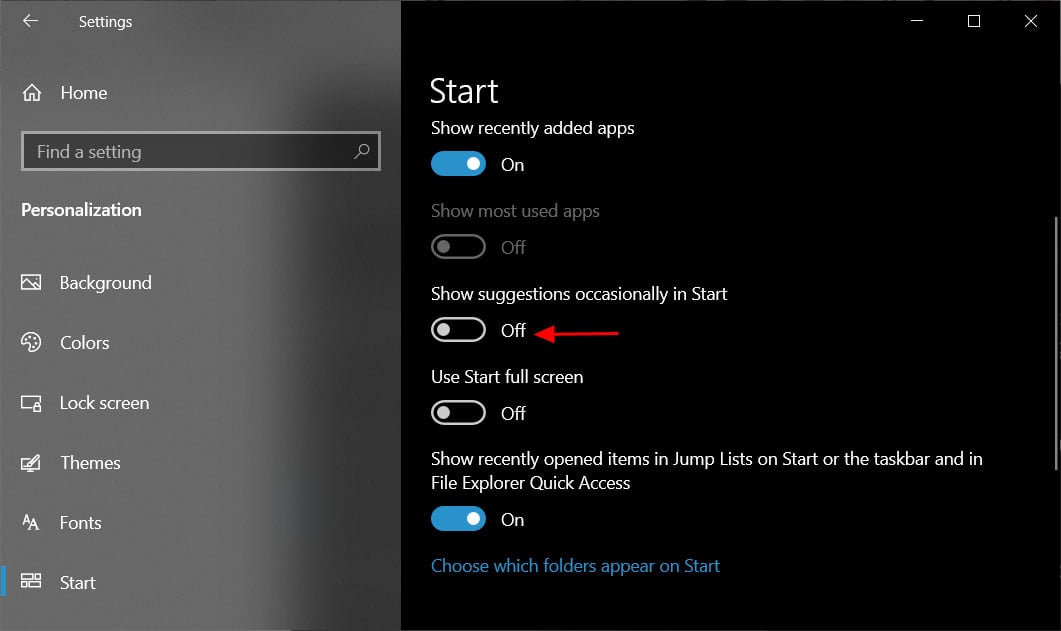
To disable these suggestions, go to Settings Start and disable ‘Show suggestions occasionally in Start‘ as shown above.

Restrict Diagnostic data

Windows 10 collects the hardware and software diagnostic data on a regular basis to improve Windows experience on your device, according to Microsoft. The data collection cannot be turned off completely, but you can control what kind of diagnostic data is gathered about you, your applications, and your device.

To manage your diagnostic data, head to Settings Privacy > Diagnostics & Feedback.

You’ll see two options—Basic and Full.

Diagnostics

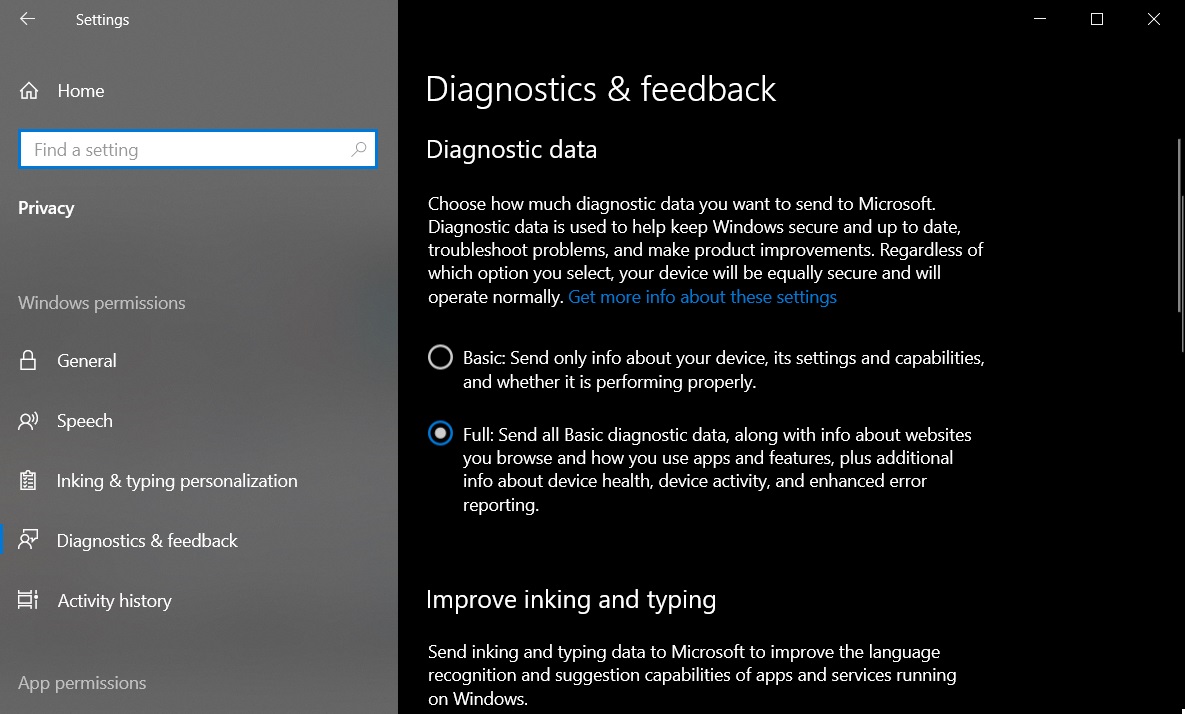
To reduce the data collection, select the first option (Basic). When the Basic option is selected, Microsoft will only record and collect your device’s basic information including settings, features, and performance.

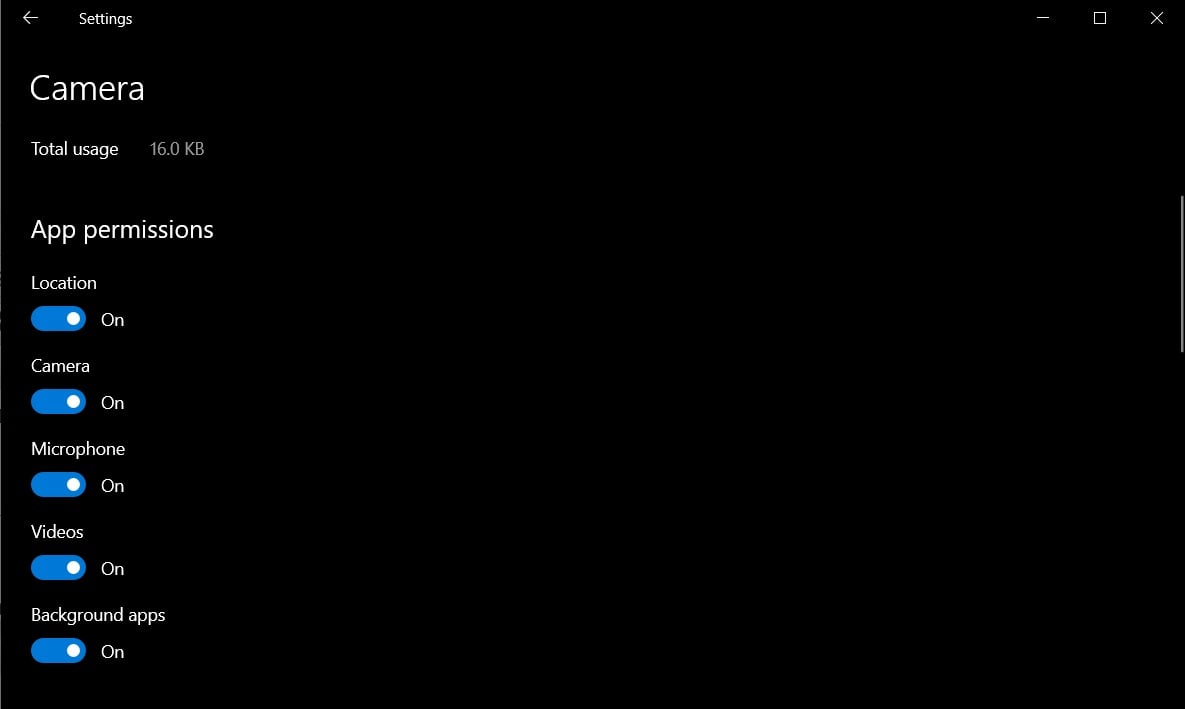
Manage permissions for location, microphone, camera

Like diagnostic data, Windows 10 Settings app also allows you to manage permissions for hardware features, such as location, microphone and camera. To disable location access for apps and Windows, you need to launch the Settings app and go to Privacy > Location, and turn off the location access option.

Similarly, you can open Microphone and camera privacy pages, and turn off the access.

When the permission is set to ‘off’, Windows will block all apps from using location, microphone or camera.

Disable the Windows Timeline (Activity history)

Windows 10 comes with a built-in activity history feature called ‘Timeline’. This feature allows you to go back in time to see and resume your work activities, and it also organizes the activities that you do on your PC, Microsoft Edge and Android phone.

Timeline works surprisingly well and it gathers your data actively, which for many is too much of a privacy risk. Fortunately, there’s a way to disable activity history completely.

To disable Timeline, follow these steps:

    1. Open Settings.
    2. Click Privacy.
    3. Open Activity History.
  1. Uncheck the “Let Windows collect my activities from this PC” checkbox and Timeline will not collect your information.
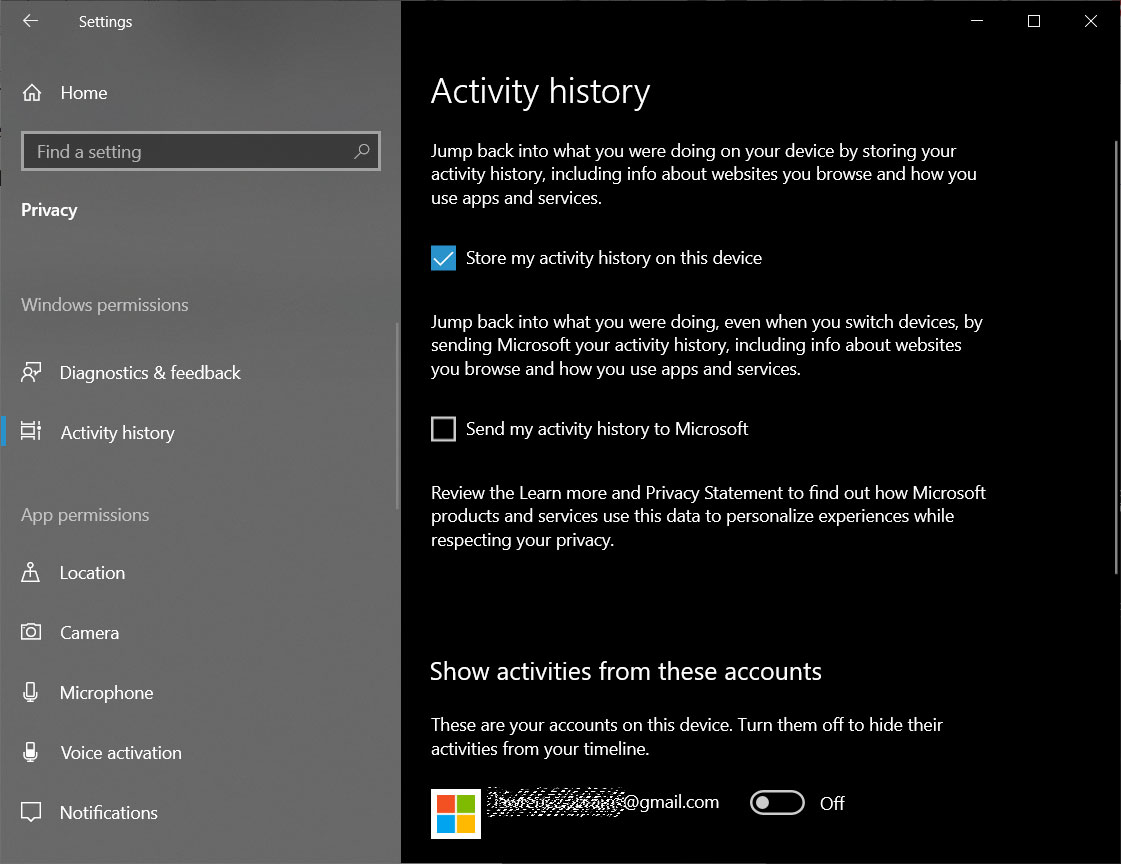
    Disable Timeline
    Disable Timeline
  2. Toggle Microsoft account under “Show activities from accounts” to Off.

Finally, you need to click on the Clear option to clear your activity history.

App permissions

Like Android and iOS, Windows 10 comes with a dedicated settings page for managing the app permissions.

Permissions

To manage app permissions, you need to open from Settings > Apps > Installed apps and click on the app (eg voice recorder) whose permissions you want to limit.

By 

Sourced from Bleeping Computer

By

‘This is taking too long to load’

The Windows 10 search bar is broken again, but this time, there is a fix.

As reported by Windows Latest, several Windows 10 users have reported seeing concerning prompts when attempting to search using Windows Search. The most common error message is “This is taking too long to load,” which appears with a reload button.

The problem remains for some even after they reload search and restart their Windows 10 PCs. Some folks are understandably spooked by the strange behavior and have theorized that their laptops might be hacked. Fortunately, that isn’t the case. The culprit is another botched Windows 10 update, specifically, version KB4550945.

“The last update that I installed was the optional update KB4550945 and I’m having this exact problem, hopefully, it gets fixed soon,” one user wrote.

The problem isn’t affecting everyone (the staff at Laptop Mag hasn’t run into any issues) and there is no evidence that this is a widespread bug. Still, not having the ability to search is an incredibly frustrating limitation, as we found out earlier this year.

How to fix the Windows 10 search bug

As with any botched update, the easiest solution is to roll back your PC to an earlier, more reliable version of Windows 10.

However, in this case, not everyone experiencing the search issue is on version KB4550945, which suggests the update is only partially, if at all, responsible. If you already installed that update and are fed up, you can try uninstalling it (some have reported success using this method). If this doesn’t help, you can always reinstall it at a later time.

Conversely, you can try updating your laptop to the latest version of Windows 10, a practice we often recommend as it ensures you have the latest security patches and features.

If that fails, Windows Latest has you covered. The site noticed that the issue was getting fixed when people repaired their Windows 10 system image. We’ll walk you through repairing a system image but you should be warned that the process requires you to run the Command Prompt. It’s not difficult, but if you shy away at any mention of code, you might want to wait for Microsoft to release an official patch.

With that in mind, here are the steps to fix the search bug by repairing your Windows 10 system image.

  • Press the Windows key + R to open Windows Run.
  • When the window opens, type “cmd.”
  • Press Ctrl+Shift+Enter to open the command prompt “cmd” as an admin.
  • In Command Prompt, type the following: “DISM /Online /Cleanup-Image /RestoreHealth and press enter.”

Feature Image Credit: Laptop Mag

By

Sourced from Laptop

By Gordon Kelly

Microsoft continues to secretly offer Windows 10 free, and you can see why. Despite new attempts to overhaul Windows upgrades, the platform continues to anger users with poor quality updates and questionable transparency. And now Microsoft has had to issue another major warning to all Windows 10 users.

Pushed to users as part of its latest ‘Patch Tuesday’ updates, Microsoft has confirmed the KB4524244 security update bundled in it can cause system freezes and crashes across every supported version of Windows 10, from Windows 10 Home right through to Enterprise and Server. Unfortunately, KB4524244 was available for four days but Microsoft has now stated it has been pulled for good.

Update: also beware KB4532693. Another security fix recently released by Microsoft, Windows Latest notes it is also causing boot failures for a number of users as well as Blue Screen of Death (BSOD) crashes. Microsoft has so far only acknowledges minor issues connected to Windows Server on the KB4532693 update page, it is still floating around unlike KB4524244. Be sure to checkout the Windows Update troubleshooter linked below, it will also enable you to proactively block this update for now.

Additional Update: problems with KB4532693 just stepped up a notch with Windows Latest now reporting that it is deleting files. Desktop files are the main form of data loss, so be careful if you save important content there while user settings are also disappearing.

“Thank you, Microsoft for the latest updates which totally wiped all settings from my system on each startup. Everything reverted to basic settings [and] all my programme information and settings were also deleted from every programme on my system. Several apps were deleted completely, keyboard settings, language screen res everything gone,” writes one user.

“My desktop is black, icons are gone, Taskbar and Start menu are also empty. Uninstalled the update and my data is still missing, I cannot find it anywhere,” states another.

Windows Latest writes that this problem is “based on a small but a growing number of user reports” so be careful and, once again, make sure you get the Windows Update troubleshooter linked below.

“This standalone security update has been removed and will not [be] re-offered from Windows Update, Windows Server Update Services (WSUS) or Microsoft Update Catalog,” wrote the company on the Windows 10 Health Dashboard.

While Microsoft has now stopped the spread, users already impacted are left to pick up the pieces. As Bleeping Computer reported earlier in the week, both AMD and Intel computers were affected with HP owners hit particularly hard. Microsoft says it is “working on an improved version of this update” but in the meantime, it recommends affected users remove KB4524244 with these steps:

  • In Windows Desktop Search type ‘update history’ then click ‘View your Update history’
  • Select ‘Uninstall Updates’
  • On the Installed Updates dialog window, find and select KB4524244, click the Uninstall button
  • Restart

Proactive users can also download the Windows Update troubleshooter, which will allow you to hide problematic updates and prevent them from reinstalling. As things stand, it is fast becoming essential software for all Windows 10 users.

This week Microsoft demonstrated the future of Windows updates. The advances target a new generation of dual-screen devices and are not meant for the millions of existing Windows 10 PCs and laptops. Meanwhile, long-overdue Windows 10 update improvements were suddenly shelved.

Microsoft, it is time to prioritize the present.

Feature Image Credit: Windows 10 updates continue to cause problems. STEVE KOTECKI


By Gordon Kelly

An experienced freelance technology journalist. I have written for Wired, The Next Web, TrustedReviews, The Guardian and the BBC in addition to Forbes. Started in b2b print journalism covering tech companies at the height of the dot com boom and switched to covering consumer technology as the iPod began to take off. A career highlight for me was being a founding member of TrustedReviews. It started in 2003 and we were repeatedly told websites could not compete with print! Within four years we were purchased by IPC Media (Time Warner’s publishing division) to become its flagship tech title. What fascinates me are the machinations of technology’s biggest companies. Got a pitch, tip or leak? Contact me on my professional Facebook page. I don’t bite.

Sourced from Forbes

Windows is a vast operating system with plenty of features you might never stumble upon. Make the most of Windows 10 with these expert tips.

Microsoft’s Windows OS isn’t any one thing; it’s an interwoven patchwork of features built atop other features that trace back to the beginning of the time-tested operating system.

With such a complex piece of software, it makes sense that there are little tricks and UI flourishes most people don’t even know about. Maybe you haven’t poked around Windows 10 too much or perhaps you’ve remained on Windows 7 for all these years. Well, it’s time to make the jump, as Microsoft ends support for Windows 7 this week.

Whatever your situation, we’ve compiled a list of useful tips that will help you get more out of your Windows 10experience. Or, at least, teach you some things you may not have known about.

Some have been available in Windows for a number of generations, while others are native to Windows 10. Microsoft’s most recent update for the OS arrived in November, but the May 2019 update added a bunch of new features and killed a handful of others. So there are plenty of new features and tricks to make the most of a constantly evolving Windows experience.

Secret Start Menu

Secret Start Menu

If you’re a fan of that old-school (i.e. non-tiled) Start menu experience, you can still (sort of) have it. If you right-click on the Windows icon in the bottom-left corner, it will prompt a textual jump menu with a number of familiar popular destinations (Apps and Features, Search, Run). All these options are available through the standard menu interface, but you’ll be able to access them quicker through this textual interface.

Show Desktop Button

Show Desktop Button

This desktop button actually dates back to Windows 7, but is handy nontheless. On the bottom-right corner of the desktop is a secret button. Don’t see it? Look all the way to the bottom and right, beyond the date and time. There you’ll find a small little sliver of an invisible button. Click it to minimize all your open windows.

There’s also the option to have windows minimize when you hover over this button versus clicking. Select your preference in Settings > Personalization > Taskbar > Use peek to preview the desktop.

Sourced from PC mag

By Ruediger Kinast

Two years ago we introduced completely rewritten and redesigned Mail and Calendar apps in Windows 10. (Not the screens pictured above.) While the apps were functional and modern looking, they still lacked a more refined and delightful look and feel. In the “software as a service” era, we’re able to improve our features and designs with a cadence that customers have come to expect. Even before the 2015 release, we began thinking about the next app iterations.

Our early redesign set the goals to visually align with Windows, reduce chrome, give the app a fresh, more refined, and beautiful look, while raising the bar of “craftsmanship” (the internal name for our efforts). The team established design guidelines grounded in a purposeful use of typography, color, and motion, to convey a delightful and highly functional app.

Timing plays a part in every story

It wasn’t until early 2017, engineering resources became available to work on our redesign. About the same time, the Fluent team (code named NEON) was launching, and actively driving adoption of the new Fluent Design System into Microsoft apps. That meant we had a refreshed design challenge; (Thank you Satya) rethinking what we kept, what we left behind, and how we became more Fluent going forward.

While the Fluent launch was exciting, our team remained mindful that we were redesigning apps that had millions of users and fans. Altering things they were used to—like title bar, ribbon, and key functionality—had to be carefully considered. Obviously, we didn’t want to alienate our users, and we were not interested in any backwards steps in usability.

One insight we gained early on in user testing was that “different” did not necessarily mean “problem.”

Integrating fresh cues from early Fluent Design mail work with the aforementioned redesign ideas turned out to be fairly straightforward — as some of the overarching principles were already aligned. Even some of the Fluent design elements, namely “acrylic” with its translucent surface treatment, were already present in some form in our existing app (semi-transparent navigation pane).

Early “Craftsmanship” refresh for mail (never shipped)
Early “Craftsmanship” refresh for calendar (never shipped)

Fluent Mail & Calendar explorations

The design explorations coming from the recently launched Fluent team didn’t meet all of the requirements we had for our apps in terms of workflow, personalization, localization, accessibility, etc. Our team examined each of those requirements, applying aspects of the Fluent Design System into our own explorations.

The first Fluent design elements we looked to implement were “acrylic” which is the translucent, glassy surface treatment for panels and “reveal”, the light effect that appears on hover to reveal actionable elements. Each of them presented their own set of challenges and we remained in close communication with Fluent and the other Office teams, learning what worked and what didn’t.

Early exploration for Fluent Mail in light theme
Early Fluent exploration for Calendar
Experimenting with a blue top bar, aligning more to the Outlook brand

Acrylic — Background or no background, that is the question

Acrylic is a Fluent Design System component that allows incorporation of light, depth, motion, material, and scale into the UI. It adds a partially transparent texture (material) to certain UI elements like panes. With its introduction one natural question that arose was: “If I can see through it, what do I see? What is in the background?” Having already established a background picture as a default within our app we asked ourselves “Does our background clash with the desktop background? Are we going to get rid of our background picture in favor of the user’s desktop picture? What about other app windows in the background that might not look pretty? How does it work with (brand) colors?” This lead to an array of explorations.

Early “empty state”-explorations (when no email is selected) with the user’s desktop showing through the acrylic and wide panel margins
Later “empty state”-exploration with less translucency and another window showing through
Later “empty state”-exploration with in-app background picture

Ultimately, we decided in favor of the in-app background photo because we knew it delighted our users. It also reduced visual background clutter in the empty state when no email is selected. (However, our users have the options of changing the picture or turning it off in personalization settings.)

Reveal on white with “brickwork”-effect between panes did not work for us

To Reveal — or not to reveal?

Reveal is a lighting effect that brings depth and focus to interactive elements. By showing borders of controls and buttons on hover it reveals actionable elements and helps understanding the UI. While the concept of reveal is great- the devil is always in the details. In the first iteration reveal not only exposed interactive elements, but also exposed the borders of controls in neighboring panels and brought attention to previously invisible different alignments of controls. For example, elements in the left navigation pane didn’t necessarily align to elements in the message list because they scroll differently. That, in turn, created sort of a brickwork-effect visible with reveal that added more visual noise to the app, something we actually wanted to get rid of. So in order to avoid all that we decided to turn off reveal in the message list- only apply it on the navigation pane and also turn off reveal on vertical lines in the folder list. With all that said, we know the Fluent design team is hard at work to improve reveal based on our feedback and we will reevaluate it’s use in other places in our app in the future.

“How do I move my window?”

A key part of the redesign was giving the user a clear information hierarchy and reducing visual clutter by removing the app window’s title bar. While not only aesthetically pleasing, it reduced the calls to action present on the screen and let the user focus on their content.

An obvious concern was that this change might cause confusion by removing users’ visual affordance for how to move the app window. Our design still allowed users to move the app by clicking and dragging the top 32 pixels, but we were worried that users might be confused if the visual affordance wasn’t present. We debated running a user study to determine the consequences of this change but realized that since other apps in Windows 10 had previously made similar changes, we could reach out to them and see if their users had experienced difficulty when their app’s title bar was removed.

What we discovered was very encouraging. The Edge team shared the experience they had using their app’s title bar exclusively to organize webpage tabs. They told us that initial user feedback was mixed, and while some users did initially have reservations, that feedback had dissipated quickly and overall opinion of the design choice was positive.

When Mail and Calendar instituted the change we saw virtually no feedback about the removal of the title bar. To the contrary, feedback referred to the app as ‘modern’ and ‘fresh’. It turned out that dragging the top of an app window was such a common pattern that our app remained completely usable without that legacy UI element.

Exploration with folder flyout

Moments of truth in code

After we designed everything and handed off specifications and comps to our partner in engineering there came the critical “moments of truth in code.” There are often deltas when it comes to fonts, colors, transparency values etc. between designing in a design program and building in code. Applying and tweaking in the real thing becomes an essential part of the process working directly with the engineers to iron out all the little kinks.

Through the testing phase (called dogfood at Microsoft), we went through multiple iterations, either to address things we had obviously missed, or things that were accessibility related based on feedback. These issues included font color contrast on acrylic, selection color with actual acrylic in code, as well as testing with different background images.

(The background colors for selected items in the navigation pane were important as fallback solution in scenarios where Fluent is not supported due to hardware or software restrictions or if it is turned off by the user.)

Reminder: Designers are not the customers

A constant point of discussion had been the selected state for accounts and folder in the left navigation pane. Fluent Design controls use a small vertical selection indicator to the left of the selected item which appears not unlike the proven unread mail bar in the message list. Despite initial concerns that the similar appearances but different meanings might confuse users, and after multiple design iterations for the unread marker and the selected state, we went ahead and implemented and tested it in dogfood. Interestingly enough, there was very little feedback about this. Users did not have problems distinguishing the two.

User testing is always a good reminder that the things we designers perceive as inconsistencies might not be perceived as such by users. In one of the discussions with a user I heard “It’s a thing that is marked because it’s important.” We learned that when seen in use context, what we perceive as inconsistencies become less important and users quickly adapt.

Details: Lines in message list

A good example where we tried to adhere to Fluent Design principles by celebrating just the content and remove as much chrome as possible from the UI are the horizontal lines in the message list. Users found it difficult to distinguish between individual messages and, based on feedback, we had to gradually bring lines back to increase usability. It turned out that just using the spacing to separate messages from each other wasn’t clear enough, especially since we had introduced a new feature of small previews of attachments (photos) in the message list and messages with varying heights started to bleed into each other. Similarly, we reintroduced the line between message list and reading pane. Sometimes the eye needs those subtle visual cues not to stumble.

Evolving story

The design of the apps today is a snapshot in time. The design will constantly improve and evolve. We’re already working on fine-tuning with information density settings, Fluent connected animations and a light theme. Expect to see more evolution from Fluent Design and the Windows Mail and Calendar apps in the months and years to come!

These apps are just two chapters in a much larger story—where the Fluent Design provides intelligence and consistency across apps and devices from 0D to 4D. The cool thing to consider as a designer is this: whether you are chatting with Cortana on Invoke, using launcher on your Android phone, inking with Edge on your Surface, or creating with Paint 3D in your Cliff House with a head mounted display, Fluent Design ensures that you (and your users) will have consistently delightful experiences.


Fluent is a collaborative effort

Find out more about Fluent Design and join the diverse community of creators!

Check out #FluentFridays on twitter @MicrosoftDesign

Follow Microsoft Design on Dribbble, twitter, and Medium

Follow me on twitter

Thanks to the team

This story reflects the effort and dedication of a great number of teams and teammates. I took on adoption for Mail and the overall communication with the Fluent and Office teams for the framework and shared components while Hiroshi Tsukahara looked at it from the Calendar perspective. Chris Bimm, who also contributed to this article, drove the effort from the PM side. Andrew Falk helped with the motion design and Barry Li was a great dev collaborator with more patience than you can imagine! Also thanks to everyone on the PM, engineering and design team who is not mentioned here but without their contribution this wouldn’t have been possible. Last but not least, a special shout-out to March Rogers and Jason Blackheart, former colleagues who laid a lot of the groundwork for this.

By Ruediger Kinast

I’m a product designer at Microsoft for Outlook & Office 365. In my freetime I produce music www.facebook.com/ruekin. Opinions are my own.

Sourced from Microsoft Design

By

Back in February, Microsoft updated Windows 10’s mail and calendar apps with a few useful features. Focused Inbox shows you only the important emails and puts everything else into an “other” tab. And the calendar app gained the ability to display travel reservations and package delivery details. But at the time, neither of these options worked for Google / Gmail accounts — only for Outlook.com and Office 365 accounts. Thankfully, that won’t be the case much longer.

Today Microsoft announced that it going to be rolling out Gmail support to Windows Insiders over the next few weeks before a wider release to all consumers. Users chosen for early access will receive a prompt to update their account settings to get started.

For all of this to work, Microsoft says it has to sync a copy of your email, calendar, and contacts to its servers. Any changes you make — composing / deleting emails, scheduling new appointments, or adding contacts — are synced back to Google so everything remains up to date.

Microsoft will be “fine tuning” the experience for Gmail users over the next few weeks before Focused Inbox and the helpful summary cards for reservations and package deliveries make their way to all Windows 10 users at a later date. If you’re a Gmail-using Windows Insider and somehow miss the prompt to test out the new features, you’ll receive another reminder “in a few weeks.”

By

Sourced from The Verge

Sourced from Fortune.

You can now add Microsoft to the list of technology companies wanting to make big money in virtual reality.

The technology giant said today it would release an update to its Windows 10 operating system called Windows 10 Creators Update, which comes with the ability for device manufacturers to build virtual reality headsets powered by Windows 10. Microsoft msft said that companies like HP Inc hpq , Lenovo, Dell, Acer, and ASUS would build new virtual reality headsets based on the new Windows 10 feature.

Get Data Sheet, Fortune’s technology newsletter.

Unlike other virtual reality headsets, such as the Sony Playstation VR or the HTC Vive, Microsoft said these new devices will be capable of producing so-called mixed reality in which the headsets can display both the physical world and the digital world, and intermix the two together for user interaction.

From Microsoft’s announcement on Wednesday:

Coming in 2017, these accessories will contain built-in sensors to enable inside-out, six-degrees of freedom for simplified setup and to more easily move around your home as you experience virtual worlds —no markers required.

Microsoft said these new devices will sell for $300 in 2017, but it did not say which manufacturers would be the first to create them. Additionally, the company said that unlike other VR headsets, including Facebook’s fb Oculus Rift, the new headsets “will work with affordable laptops and PCs.”

Currently, powerful VR headsets like the Oculus Rift and HTC Vive require powerful computers that tend to be more expensive than what the average consumer would spend. A decent computer to run VR content smoothly can cost over a $1,000—although some can be sold cheaper—but would generate a lesser experience in terms of graphics and speed.

For more about virtual reality, watch:

Microsoft currently sells for $3,000 its HoloLens augmented reality device, which overlays digital, holographic images onto the real world.

Sourced from Fortune